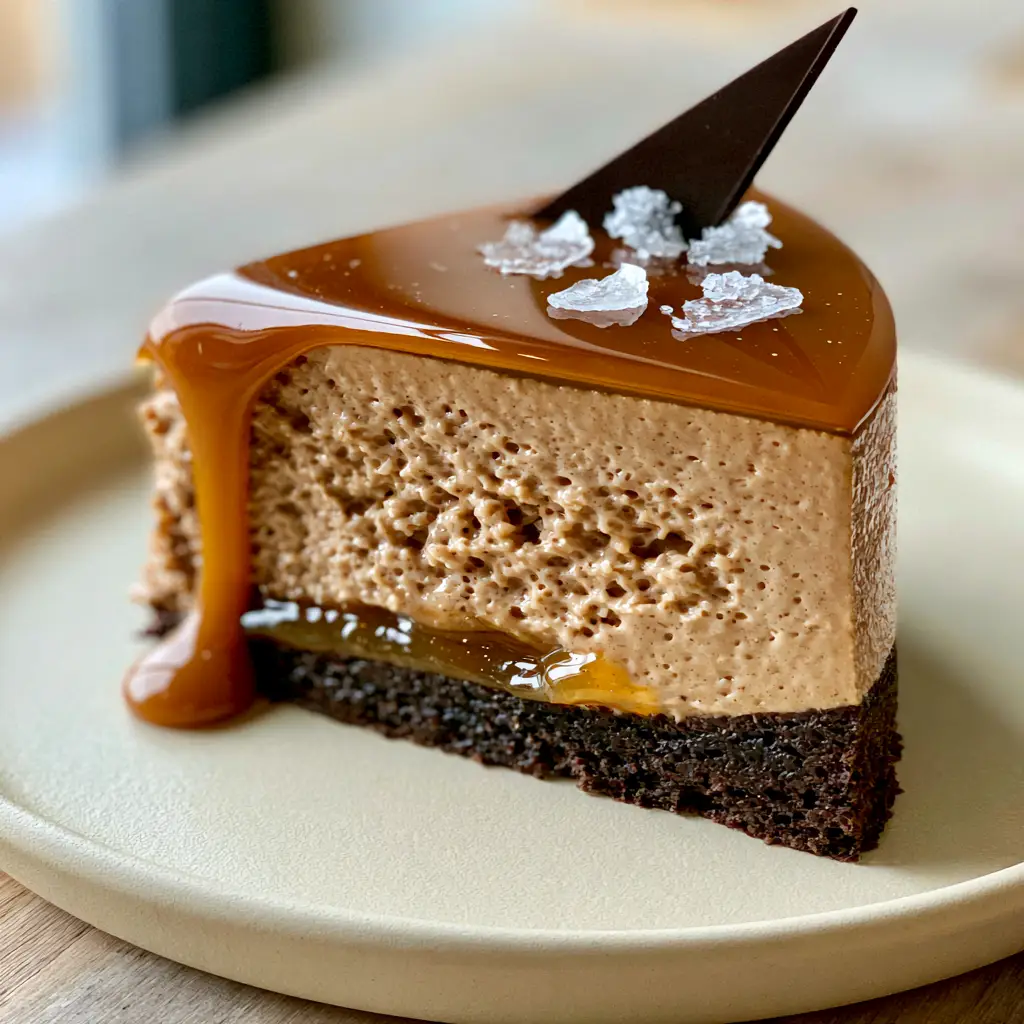
This caramel mousse cake is the ultimate showstopper for bakers who crave professional-grade results at home. Imagine a deep, dark chocolate sponge base topped with a light-as-air salted caramel mousse that hides a decadent, molten golden center. Every slice is finished with a shimmering amber mirror glaze and a pinch of flaky sea salt, creating a dessert that looks like it stepped right out of a high-end French patisserie.
Whether you are planning a birthday celebration or looking to impress at your next dinner party, this caramel mousse cake delivers on every level. The contrast between the aerated mousse and the viscous caramel drip makes it a dream for food photography and an even better treat for your taste buds. If you’ve enjoyed making moist chocolate cupcakes, this recipe is the natural next step in your baking journey.
Why You’ll Obsess Over This Salted Caramel Showstopper
- Multi-Textural Bliss: You get the crunch of the salt, the fluff of the mousse, the snap of dark chocolate, and the ooze of the caramel core.
- Stunning Visuals: The reflective amber mirror glaze catches the light perfectly, making it the star of any Pinterest board.
- Perfect Balance: The bitterness of the dark chocolate sponge perfectly offsets the intense sweetness of the salted caramel.
- Make-Ahead Friendly: This cake actually benefits from being made in stages, taking the stress out of hosting.
Essential Components for a Professional Caramel Mousse Cake
To achieve that bakery-style finish, each layer of your caramel mousse cake serves a specific culinary purpose. Using high-quality ingredients is key to the clean, distinct layers seen in the visual blueprint.
The Dark Chocolate Sponge Foundation
Dutch-Processed Cocoa Powder: This provides the deep, nearly black color and the mellow, earthy chocolate flavor that anchors the sweet mousse. If you have leftovers, they are perfect for leftover chocolate cake for cake pops.
Buttermilk: The acidity reacts with the leavening agents to create a tight, fine-crumbed sponge that can support the weight of the mousse without getting soggy.
The Molten Salted Caramel Core
Heavy Cream (36% Fat): Essential for a rich, viscous texture that stays “molten” even when chilled. Do not use milk here; you need the fat for that iconic golden caramel drip.
Maldon Sea Salt: This isn’t just a garnish; it cuts through the sugar to highlight the toasted notes of the caramel.
The Aerated Caramel Mousse
Gelatin Leaves: These provide the structure needed for a clean slice while maintaining a delicate, melt-in-the-mouth texture. We are aiming for visible air bubbles in the cross-section.
Heavy Whipping Cream: Beaten to soft peaks, this is what gives the caramel mousse cake its voluminous, light-brown appearance.
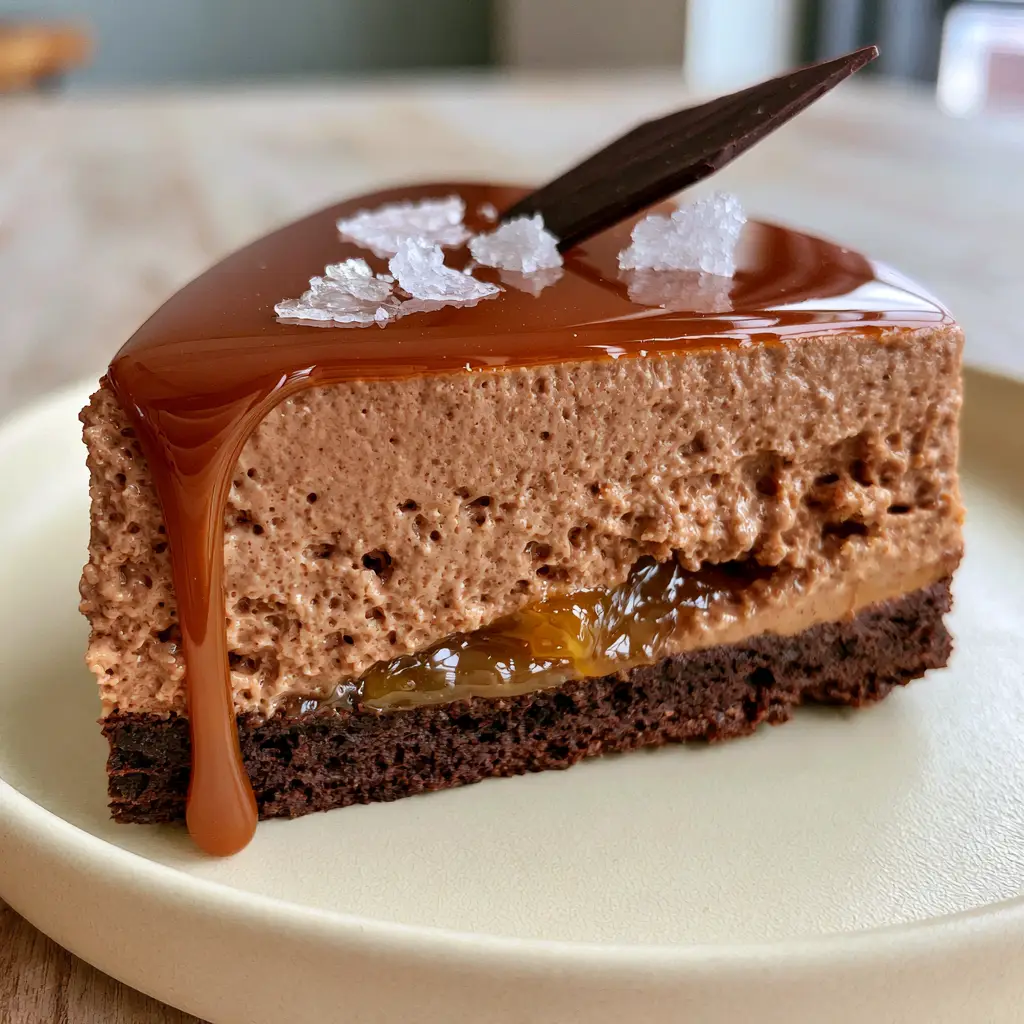
How to Build Your Masterpiece Step-by-Step
Step 1: The Dark Chocolate Sponge Base
Preheat your oven to 350°F (175°C). Line a 9-inch (23cm) springform pan with parchment paper to ensure an easy release for your caramel mousse cake foundation.
Whisk together your dry ingredients, including 1 cup (125g) of flour and 1/2 cup (45g) of cocoa. Stream in 1/2 cup (120ml) of hot coffee; the heat “blooms” the cocoa, intensifying the dark chocolate profile. Bake for 18-20 minutes until a skewer comes out clean.
Step 2: The Viscous Salted Caramel Center
In a heavy-bottomed saucepan, melt 1 cup (200g) of granulated sugar until it turns a deep amber color. Carefully whisk in 1/2 cup (120ml) of warm heavy cream—watch out for the steam!
Once smooth, stir in 2 tbsp (30g) of salted butter and a generous pinch of sea salt. Pour this into a small silicone disk mold (about 5 inches/12cm) and freeze until solid. This “insert” technique ensures the molten core stays perfectly centered in your caramel mousse cake.
Step 3: Whipping the Light-Brown Mousse
Create a caramel base by melting sugar and deglazing with cream, then stir in your bloomed gelatin. Once cooled to room temperature, gently fold this into 2 cups (480ml) of whipped cream.
Visual Cue: You should see tiny air bubbles forming in the mixture. This aerated texture is what makes the caramel mousse cake feel light rather than heavy. If you love this texture, you might also enjoy the layers in an authentic Italian love cake.
Step 4: The Assembly and Chill
Place your chocolate sponge at the bottom of a 9-inch (23cm) silicone mousse mold. Pour in half of the caramel mousse. Place the frozen caramel disk in the center, then top with the remaining mousse. Smooth the top with an offset spatula and freeze for at least 6 hours, or overnight.
Step 5: The Amber Mirror Glaze Finish
Combine 1 cup (200g) sugar, 1/2 cup (120ml) water, and 2/3 cup (150ml) sweetened condensed milk in a pot. Add bloomed gelatin and pour over white chocolate chips. Add a drop of orange and brown gel food coloring to reach that perfectly smooth, highly reflective amber shade.
Pour the glaze over the frozen cake in one continuous motion. Watch as it coats the sides, catching the light like glass. Just before it sets, garnish with a single, ultra-thin dark chocolate shard and three distinct flakes of Maldon sea salt.
Expert Tips for a Flawless Finish
- Temperature is Everything: Ensure your mirror glaze is between 90°F-94°F (32°C-34°C) before pouring. Too hot and it melts the mousse; too cold and it won’t drip smoothly.
- Avoid Air Bubbles: When blending your glaze, keep the immersion blender submerged to prevent creating bubbles that ruin the “mirror” effect.
- The Clean Cut: Use a sharp knife dipped in hot water and wiped dry between every single slice to maintain those sharp, distinct layers.
- Bloom Your Gelatin: Always use cold water to bloom gelatin to ensure it dissolves evenly without clumps.
Storage and Make-Ahead Instructions
This caramel mousse cake can be stored in the refrigerator for up to 3 days. Keep it in a cake carrier to prevent the mirror glaze from absorbing “fridge smells.”
You can freeze the unglazed cake for up to 2 weeks. For the best results, glaze the cake the day you plan to serve it to maintain that high-gloss, reflective shine.
What to Serve With This Dessert
Since this cake is incredibly rich, pair it with something tart or bitter. A sharp espresso or a side of fresh strawberry puree provides a beautiful acidic contrast. If you’re hosting a larger party, these fudgy dark chocolate brownies make a great finger-food companion on a dessert table.
Frequently Asked Questions
You can use boiling water instead of coffee, but the coffee is highly recommended as it intensifies the chocolate flavor without making the cake taste like coffee.
Yes, you can substitute 1 tablespoon of gelatin powder for every 4 sheets of gelatin. Make sure to bloom the powder in cold water for 5-10 minutes before melting.
Because of the high fat content from the heavy cream and butter, the center remains a viscous, thick ‘molten’ texture even when chilled, rather than freezing solid.
A dull glaze usually happens if it was poured at too high a temperature or if it wasn’t blended enough with an immersion blender to emulsify the fats. Aim for 92°F (33°C) for maximum shine.
The Ultimate Caramel Mousse Cake Recipe
Caramel Mousse Cake with a Molten Salted Caramel Core
Ingredients
Equipment
Method
- Combine dry ingredients with hot coffee and buttermilk. Bake in a 9-inch pan at 350°F (175°C) for 20 minutes.
- Melt sugar to amber, add warm cream and salt. Pour into a 5-inch mold and freeze until solid.
- Layer sponge, half of the mousse, the frozen caramel insert, and remaining mousse. Freeze for 6 hours.
- Prepare amber mirror glaze and pour over the frozen cake at 92°F. Garnish with sea salt and chocolate shards.
Notes
Use a warm knife for perfect slices.
Share Your Masterpiece!
Did you recreate this caramel mousse cake? We want to see your amber mirror glaze and that molten caramel drip! Follow @KellyTaste on Pinterest for more dessert inspiration and save this recipe to your “Dream Desserts” board. Leave a 5-star rating and a photo in the comments below if you loved it!