When it comes to side dishes that steal the spotlight, these Crack Green Beans are in a league of their own. Forget the soggy, overcooked casseroles of the past; we are talking about vibrant, tender-crisp beans bathed in a decadent, syrupy glaze that balances salty, smoky, and sweet notes in every bite.
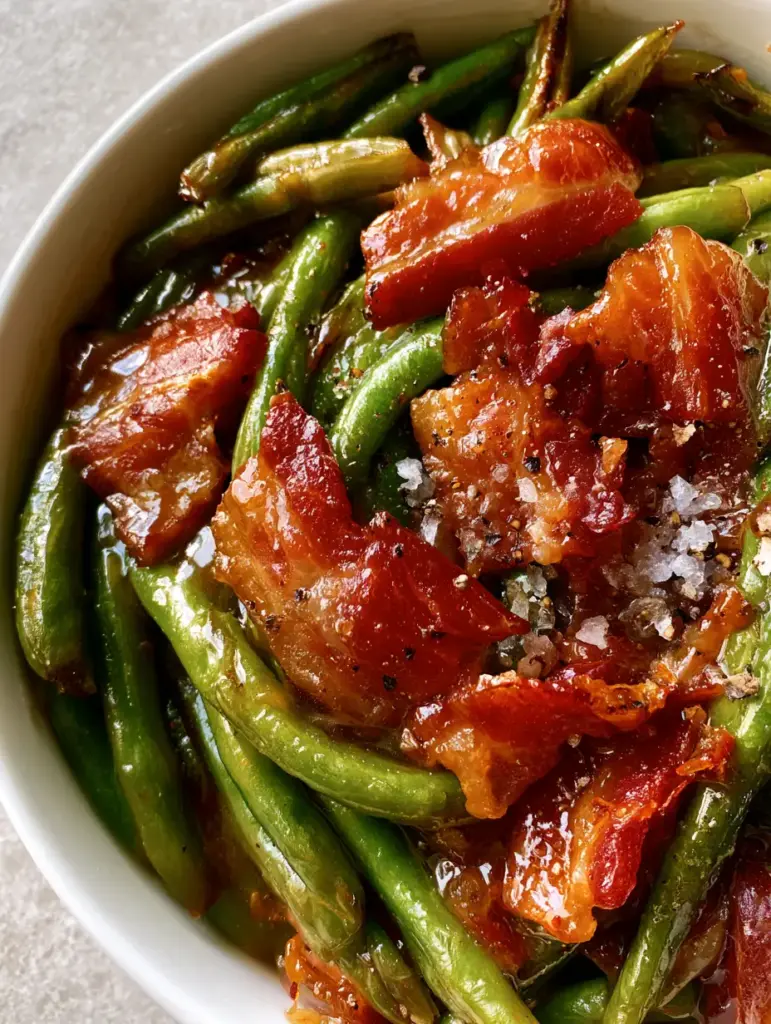
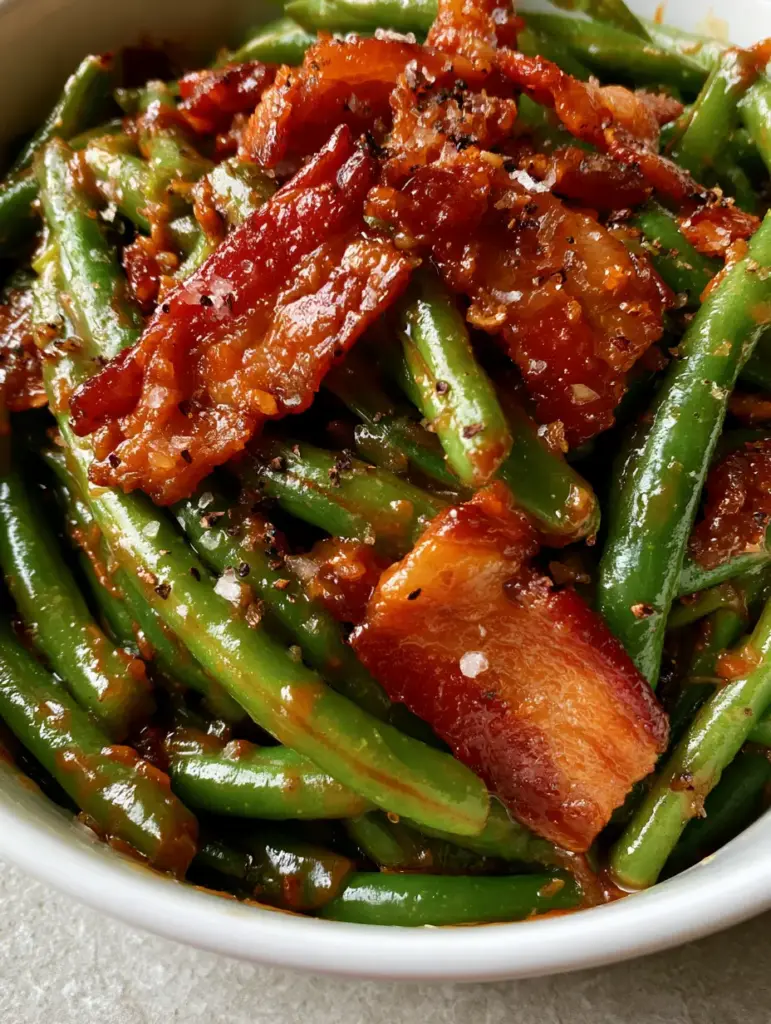
The visual appeal of this dish is undeniable, featuring a high-gloss finish from emulsified butter and rendered bacon fat. Large, jagged chunks of caramelized thick-cut bacon are scattered throughout, providing a satisfying crunch that contrasts perfectly with the snap of the fresh beans.
Whether you are preparing a holiday feast or a simple weeknight dinner, these Crack Green Beans bring a gourmet aesthetic and “can’t-stop-eating” flavor profile to your table. The secret lies in the forensic attention to detail—from the coarse sea salt flakes to the aromatic minced garlic bits that cling to every bean.
Why This Crack Green Beans Recipe Works Every Single Time
- The Texture Trifecta: We achieve a perfect tender-crisp bean, avoiding the mushiness often found in slow-cooked recipes while ensuring they are fully infused with flavor.
- Symphony of Flavors: The combination of dark brown sugar, melted butter, and rendered applewood bacon fat creates a “crack” glaze that is scientifically engineered to trigger the palate’s reward centers.
- Visual Masterpiece: With glistening highlights and deep mahogany bacon tones, this dish looks like it was plucked straight from a professional food photography set.
- Culinary Precision: By using coarse sea salt and cracked black pepper, we provide “pops” of seasoning that cut through the richness of the syrupy glaze.
Essential Ingredients for the Ultimate Crack Green Beans
Fresh Green Beans: You will need 2 lbs (900g) of fresh, trimmed green beans. Look for vibrant, snap-tight beans that are free from blemishes to ensure that iconic tender-crisp result.
Thick-Cut Applewood Bacon: We use 8 oz (225g) of premium thick-cut bacon. This provides the “jagged, caramelized chunks” described in our visual blueprint, offering more substance than standard thin slices.
Dark Brown Sugar: 1/2 cup (110g) of packed dark brown sugar is the backbone of our syrupy glaze. The molasses content in dark brown sugar adds a depth of color and a hint of caramel that light sugar lacks.
Unsalted Butter: 4 tbsp (56g) of high-quality butter provides the fat necessary to create a glossy emulsion. Using unsalted butter allows us to control the seasoning precisely with the coarse sea salt finish.
Minced Garlic Bits: 3 large cloves (approx. 15g) of fresh garlic, minced finely. These bits become suspended in the glaze, providing aromatic bursts without overpowering the sweetness.
Coarse Sea Salt & Cracked Black Pepper: These aren’t just seasonings; they are visual elements. The large crystals and flakes catch the light and provide a crucial textural contrast to the sticky sauce.
The Professional Kitchen Tools You Will Need
To achieve the high-resolution, gourmet look of our Crack Green Beans, you will need a few specific tools. A large, white ceramic baking dish is essential—not only for even heat distribution but also to provide that clean, neutral background that makes the vibrant green beans pop.
A heavy-bottomed skillet, preferably cast iron or stainless steel, is required for rendering the bacon fat and achieving those perfectly caramelized, crispy edges. You will also need a fine-mesh spider strainer or slotted spoon for the blanching process.
Step-by-Step Culinary Instructions for Crack Green Beans
Phase 1: The Precision Blanch for Vibrant Color
Bring a large pot of heavily salted water to a rolling boil. Prepare an ice bath nearby (a large bowl filled with 50% ice and 50% cold water).
Submerge the green beans in the boiling water for exactly 3 minutes. This par-cooking step softens the cellular structure while “locking in” the chlorophyll, ensuring they stay vibrant green rather than turning a dull olive brown.
Immediately transfer the beans to the ice bath using your spider strainer. This stops the cooking process instantly, preserving the “snap” that defines high-end Crack Green Beans.
Phase 2: Rendering the Bacon to Perfection
In your heavy skillet over medium heat, add the thick-cut bacon chunks. Do not preheat the pan; starting with a cold pan allows the fat to render out slowly, resulting in crispier meat.
Cook until the bacon is deeply golden and caramelized, which should take about 8–10 minutes. Remove the bacon with a slotted spoon and set aside on a paper towel, but keep the rendered fat in the pan.
The liquid gold remaining in the pan—the bacon fat—is the “secret” foundational ingredient that creates the characteristic sheen and smoky undertone in our final dish.
Phase 3: Emulsifying the Glossy Syrupy Glaze
Lower the skillet heat to medium-low. Add the butter to the bacon fat, stirring as it melts. Once bubbling, whisk in the dark brown sugar and minced garlic bits.
Continue to whisk for 2 minutes until the sugar has completely dissolved and the mixture begins to thicken into a syrupy consistency. You are looking for a glaze that coats the back of a spoon with a heavy, mirror-like gloss.
This emulsification of butter, sugar, and animal fat is what gives these Crack Green Beans their addictive, “crack-like” quality that users crave.
Phase 4: The Final Bake and Glaze Integration
Preheat your oven to 375°F (190°C). Arrange the blanched green beans in your white ceramic baking dish, ensuring they are spread out relatively evenly.
Pour the hot brown sugar and butter glaze over the beans. Use tongs to toss them thoroughly, ensuring every single bean is “heavily coated” in the syrupy mixture as per our visual blueprint.
Scatter the caramelized bacon chunks over the top. Bake for 10–15 minutes, or until the sauce is bubbling and the beans have reached a perfect tender-crisp state.
Expert Tips for Success with Crack Green Beans
- Dry the Beans: After the ice bath, make sure the beans are completely dry before adding them to the baking dish. Excess water will dilute the glaze and prevent it from sticking properly.
- Watch the Sugar: Sugar can burn quickly. If your glaze looks like it is darkening too fast in the oven, tent the dish loosely with foil.
- The Garlic Timing: Never add garlic to a screaming hot pan. We add it to the melting butter and sugar to gently infuse the flavor without scorching the bits into bitterness.
- The Salt Finish: Always add the coarse sea salt flakes *after* the dish comes out of the oven. This ensures the crystals remain visible and provide that crunchy “pop” on the tongue.
Keeping Your Crack Green Beans Fresh: Storage and Reheating
If you happen to have leftovers, these Crack Green Beans can be stored in an airtight container in the refrigerator for up to 3 days. However, be aware that the sugar glaze will continue to soften the beans over time.
To reheat, avoid the microwave, which can make the beans rubbery. Instead, place them back in a skillet or a 350°F (175°C) oven for a few minutes until the glaze liquefies and the bacon crisps back up.
We do not recommend freezing this dish, as the moisture crystals will destroy the delicate cell structure of the green beans, leading to a mushy texture upon thawing.
What to Serve with Your Gourmet Crack Green Beans
These beans are a versatile powerhouse. They pair exceptionally well with savory proteins that benefit from a sweet and smoky sidekick. Try serving them alongside meatballs in dijon gravy for a sophisticated comfort meal.
If you are looking for a more global flair, the sweetness of the beans provides a lovely counterpoint to the spices in chicken shawarma. They are also a classic accompaniment to holiday roasts or even a simple weekday chicken breast.
For those who love variety in their vegetables, you might also enjoy comparing this sweet-glaze style to my garlic chili green beans or these earthy green beans with mushrooms. If you want a simpler stovetop version, check out my garlic butter sautéed green beans.
Answering Your Questions About Crack Green Beans
While fresh is best for that ‘tender-crisp’ texture, you can use frozen. Ensure they are completely thawed and patted extremely dry to prevent the glaze from becoming watery.
The key is the emulsification of the butter, brown sugar, and rendered bacon fat. Whisk them over medium-low heat until the sugar is fully dissolved and the mixture coats the back of a spoon.
Yes! You can blanch the beans and cook the bacon/glaze a day in advance. Store them separately and combine just before baking to preserve the texture.
Thick-cut applewood or hickory-smoked bacon is ideal. It holds its shape during baking and provides those large, jagged, caramelized chunks that are central to the dish’s appeal.
This usually happens from overcooking. Make sure to only blanch for 3 minutes and immediately shock them in an ice bath to lock in that vibrant green color.
The Ultimate Crack Green Beans Recipe Card
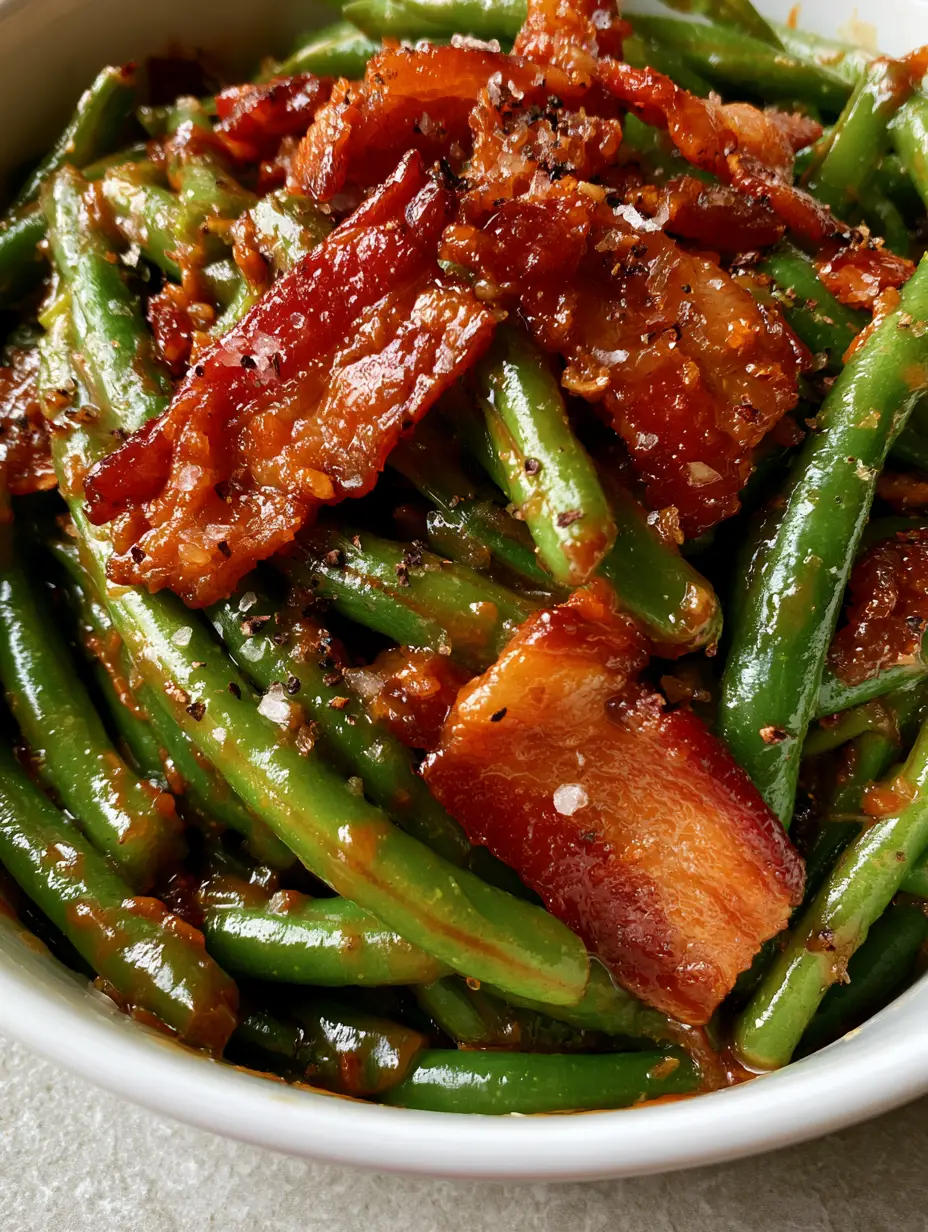
Crack Green Beans with Caramelized Applewood Bacon and Glossy Brown Sugar Glaze
Ingredients
Equipment
Method
- Boil the trimmed green beans in salted water for 3 minutes until vibrant and tender-crisp. Immediately shock in an ice bath to stop the cooking.
- Drain the beans thoroughly and pat dry. Place them into a white ceramic baking dish.
- Cook bacon chunks in a cold skillet over medium heat until caramelized and crispy. Remove bacon but keep the rendered fat in the pan.
- Add butter, brown sugar, and minced garlic to the bacon fat. Whisk over medium-low heat until it forms a thick, syrupy, glossy glaze.
- Pour the syrupy glaze over the green beans in the dish. Toss to coat heavily. Top with caramelized bacon chunks.
- Bake at 375°F (190°C) for 10-15 minutes. Finish with coarse sea salt and cracked black pepper before serving.
Notes
Use dark brown sugar for a deeper molasses flavor and richer color.
Concluding the Ultimate Crack Green Beans Experience
There is a reason these are called Crack Green Beans—the combination of the thick, glossy glaze, the smoky applewood bacon, and the fresh snap of the beans is truly addictive. This recipe takes a humble vegetable and elevates it to a five-star side dish that will have your guests asking for the recipe before the meal is even over.
If you enjoyed making this visually stunning and delicious dish, please leave a comment below and let me know how it turned out! Don’t forget to follow me on Pinterest for more culinary inspiration and high-RPM recipes. Sharing this post with your friends helps support the blog and keeps the recipes coming!